Thursday, March 31, 2016

Crocheted Thoughts (TSS 011)


Alyssa Thomas designed this block for The Splendid Sampler in honor of three generations of crafters in her family - her Grandmother tatted doilies, her mother crocheted and she quilts. Although not enthusiastic about this pattern, I decided to work it as is (versus going renegade) to practice my chain stitch. It was slow and painful, but I did it (and I'm glad I'm done with it).

I do love the colors. As I've mentioned before, I'm determined to "break out the good stuff" so I reached into my stash of ThreadWorx overdyed floss (#01138) from Farmington's Rocking Horse Shop.

As mentioned earlier, I'm a little behind due to a recent loss in the family, but I do hope to catch up this weekend. It's hard to work on these blocks without my little supervisor watching my every stitch while nestled on top of my pattern.

+*+*+*+*+*+*+*+*+*+*+*+*+*+*+*+*+*+*+*+*+*

That's a lot of pieces!

I've decided to keep a counter at the bottom of these posts to track them. 
The totals are based on the original patterns and not on deviations.

Crocheted Thoughts = 13


Total to Date: 207 pieces*

*The count only includes the blocks I've completed to date

Tuesday, March 29, 2016

Sweet Gin

I'm too sad to quilt. I lost my sweet, little Gin yesterday. My love, my sunshine, of 18 years crossed the Rainbow Bridge last night.


How can I sit at my machine without her supervising my stitching? Or embroider without her sitting in the middle of the pattern? Who's gong to test my quilting for softness and claim every quilt as her own? 

Heartbroken.


Saturday, March 19, 2016

Iowa (TSS 010)


Although Sherri McConnell calls it "Iowa", I've decided "Reflections" is a more apt name. Pretty cool how cutting it a certain way caused that lovely solid line through the middle - it reminds me of a horizon. Not a perfect bloc, but it is one I'll happy add to my sampler quilt.

10 down - 90 to go!
We are at 10% completed!

+*+*+*+*+*+*+*+*+*+*+*+*+*+*+*+*+*+*+*+*+*

That's a lot of pieces!

I've decided to keep a counter at the bottom of these posts to track them. 
The totals are based on the original patterns and not on deviations.

Iowa = 14


Total to Date: 194 pieces*

*Does not include TSS 008 - I'm remaking that one

Wednesday, March 16, 2016

Friends Around the Corner - FAIL! (TSS 008)

Thought you might laugh along with me. 

I saw Block #8 come out and immediately thought "fabric folding" for the center. 


Now it's been a dozen years since I've done this technique so I pulled out my book, Fantastic Fabric Folding by Rebecca Wat. Hmmm... Screwed up the first one. And the second attempt. Trying for the third I had a better idea how it goes together. Well, not perfect - the center didn't quite meet - but I could cover it in beads. 


Well, I went to trim it to add the corner triangles and realized I screwed up again! I forgot the seam allowance and the flower is too small!

Oh well. I could add borders or something, but, as it was a little wonky, I think I'll make a fourth.

Monday, March 14, 2016

Local Quilt Shop (TSS 009)


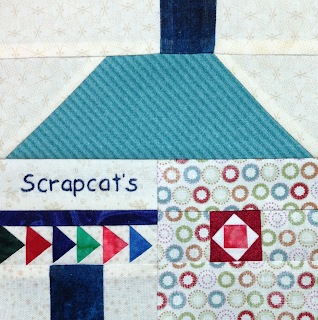
Another 6" block done - this one is Scrapcat's Quilt Shoppe!  Yes, you may've noticed that I skipped #008 in the series - I have some ideas, but I need to read up on the technique. In the interim, I played with this one.

I had the nicest compliment about my embroidery. Someone said her machine only does monograms. I told her mine was done by hand. I can't hand draw letters so I typed it out in Microsoft Word. I printed out the pattern and used a light box to transfer to my prepared fabric


I also decided I needed to add some "quilty features" to my Quilt Shoppe block so I paper-pieced a flying geese for over the door and a square-in-a-square for the window.


Cute, eh? It's made of scraps from other blocks.


I was going to add other quilty effects (like a strip-pieced roof or "siding" made from selvages), but the sections were so small the details were lost in the seams. 


+*+*+*+*+*+*+*+*+*+*+*+*+*+*+*+*+*+*+*+*+*

That's a lot of pieces!

I've decided to keep a counter at the bottom of these posts to track them. 
The totals are based on the original patterns and not on deviations.

Local Quilt Shop= 17


Total to Date: 180 pieces*

*Does not include TSS 008

Saturday, March 12, 2016

Snug as a Bug (TSS 007)


Just a little behind but finally finished my Snug as a Bug block by Amy Sinibaldi. I knew the moment I saw it that I needed to pull out my crazy-quilting skills! And my crayons.

Have you ever done this? Color in an area with Crayolas to give your embroidery another dimension? Super easy. Just make sure to heat set it with your iron. Before pressing, cover the area with a scrap piece of fabric to prevent any melting wax from transferring to your iron.


The embroidery and the coloring went well - the child reminds me of my oldest niece, Moniqua. Now 29 (and still beautiful), Moniqua was a beautiful baby with this shock of dark, thick hair and beautiful big eyes. 

Heat setting was the last time anything "went right" with this block. With each step in completing this block I thought, "Well, I blew it now!" But I LOVE IT!

Oops! That shouldn't have happened!

Here's a good example. I had decided not to piece this 2 1/2" x 2 1/2" quilt because I thought adding the extra seams would be too bulky for the tiny machine embroidery stitches. So, I decided to use fusible web to adhere the sections in place. It's been years since I fused - had to scrounge around the quilt room to even find a piece of fubsible web - and once I pressed I remembered why I don't like it.

GAPS! DOH!


See the creamy background peak through? I was so careful prepping the crazy quilt pieces and pressing into place but still had gaps. Simple fix? Pigma pens. I knew I'd eventually sew over those seams so I filled in the gaps and heat set the ink.

That's a glimpse of one of my pens in
the upper left corner. Purple, I think.

And once I added my stitches, perfect! Disaster averted. Note to self, if I ever do another block like this, add the horizontal (shorter) crazy stitches first and then the long vertical ones over it. Oh well!


Keeping my promises.

I think the other reason I love this block is the ability to use up my scraps - these scraps were originally used in the Happy Happy block so it ties in well with my other completed blocks.  I also promised to break out the saved 'rainy day' threads and fabrics. I love the dimension the variegated thread has added to the stitches and the border. 

The clear foot in the upper left was the key to my machine
embroidery success! Makes for perfect pivots and easy guiding.

Great Tool Tips

Amy Sinibaldi had a great tip on her blog for this pattern. See those extra thick lines in the pattern above? The ones in the 'blanky' portion of the embroidery? She said:
For a more dynamic look when embroidering with the backstitch, go back in and thicken your line at the curves. It adds a subtle touch of character
I will have to remember that.

Admittedly, I was a little nervous marking my block for the embroidered border. Hated the idea of screwing this up on the last step before completion, but I rationalized that, if I blew it, I could trim it away and add a pieced border.

Love how delicate the variegated thread made the
border embroidery look! 

So I pulled out my trusty post-it notes. Yeppers, post-it notes. My block should measure 6 1/2" raw, but I needed to add a 5" top-stitched border before trimming. To make sure I used the right marking lines and could visually center the embroidery, I adhered post-its along the marking lines on the ruler. The stickiness is only temporary and gave me a window to work with.

Always keep post-its of various sizes as hand

I also keep a stack of small post-it notes next to my machine. Peel of a quantity of them (a dozen or so) and adhere it to your machine's throat plate as a temporary sewing guide. Really handy when working with bulky materials and can't see the markings on the plate. 

+*+*+*+*+*+*+*+*+*+*+*+*+*+*+*+*+*+*+*+*+*

That's a lot of pieces!

I've decided to keep a counter at the bottom of these posts to track them. 
The totals are based on the original patterns and not on deviations.

Snug as a Bug= 1


Total to Date: 163 pieces

Sunday, March 6, 2016

Prepping Fabric for Hand Embroidery - Redux

I originally posted this in 2011, and, in anticipation for today's release of The Splendid Sampler, I thought I'd re-share. I'd added some updated comments in blue.


So much to do and so little time!  A friend asked how do I prep my fabric for embroidery because I don't use a hoop so I thought this would be a good time to share.  The below instructions work for me, and I hope you find them useful for yourself!

If you are participating in a Block of the Month (BOM), prepare all your squares (plus one or two extra) ahead of time.  That way, when you are ready to transfer your new pattern, the squares are all ready to go!  I like to prep 1 or 2 extra squares in case something happens when I'm transferring the pattern.  If I don't need them, then I can use them afterwards for a quick project to give as a gift (like the Mug Rugs I made last month).


Embroidery 101: Prepping the Fabric

1. I love Kona Cotton (though I will use others if it suits the project). I always buy more than I need, wash it, label it, and set it somewhere safe. Note, not all white fabrics are equal so always ensure you have enough for a project because matching it later will be impossible.

I STILL love Kona cotton, but, for scrappy projects, I will mix and match my background.

2. When cutting, always cut slightly larger than needed to allow for edges shredding or a little distortion when embroidering. For Birdie (image above), my finished block is 8.5" square so I cut it into 10.5" square.

3. When pressing, I like to use Mary Ellen's Best Press to give the piece a little stiffness and a very smooth surface.  

And I still LOVE Mary Ellen's Best Press. It's light, does not leave residue on your iron or ironing board, and does not spot on the fabric.

4. I cut a piece of Pellon's lightest fusible interfacing about a half inch smaller than my fabric and fuse it to the wrong side. Several good tips to keep in mind:
  • Make sure your fabric has no lint or pet hair on it prior to fusing - it will show!
  • After I fuse, I let my fabric rest for a moment or two giving the interfacing time to cool/adhere.
  • JoAnn Fabrics sends out regular 40% off coupons so I buy my interfacing by the bolt.

5. Using my fabulous light box (also purchased with my 40% off coupon), I will transfer my design to my fabric.
  • Print pattern and cut any extra paper away from the design.
  • Tape pattern to the light box. To prevent the tape from permanently adhering to the box, I will apply the tape to my jeans first and then use it to tape the pattern down (fuzz on the tape prevents it from permanently sticking to my light box which causes a bumpy transfer surface later).
  • Tape the fabric to the light box (centering it using a ruler) and tape down with more "fuzzy" tape.
  • Trace pattern using color Pigma pens. I always trace the lines in the same color I will use to stitch because it guides me to color placement later and is covered by the floss.  Here is my February block for Birdie Stitches: 


6. After transferring the pattern, I will carefully remove the fabric from the box and peel off all the tape. Then I will press the fabric (no steam) to set the ink. 

I've had phenomenal success with these techniques and hope they help you, too. 


Elisa

Saturday, March 5, 2016

Focal Point (TSS 006)


Another block completed in The Splendid Sampler quilt-along.  I'm loving Natalia Bonner's Focal Point - can you believe it's only 6" finished?!? 36 pieces with most of them measuring 1" finished. I had to pull a few tricks out of my hat for this finished block.

Pressing not pins

For the smaller piecing, I prefer not to use pins, if possible, to avoid distorting the fabric. As I'm piecing cotton on cotton, I will align right-sides together and press them together. The cotton will hold in place during sewing.


Take steps to avoid the shred.

Small pieces versus feed dogs can shred easily, but there are certain steps you can take to avoid this. 

Swap out your throat plate with the oblong opening to one with a round opening. As you sew, it's harder for the fabric to get pulled down/pushed down into the bobbin area and shred. 


Use a scrap piece of fabric as a "leader". I will feed this leader at the beginning and ending of all chain piecing. It keeps the threads taut, and you can use it to guide the pieces as you sew.


Don't start sewing from the tip of the small square towards the center.  Reverse that. Otherwise, it's much easier for the tip of the fabric to get pulled down into the bobbin area and shred. 


Trimming and pressing.

Notice how I trimmed below. I don't cut the background fabric before pressing. That way....


... if the flipped fabric (the blue one in the image below) comes up short, I can use the background fabric as my guide when I align the next section for joining.


Look how beautifully this 1 1/2" x 2 1/2" section went together! Like others in the group, I'm an advocate for using starch (personal preference Mary Ellen's Best Press) for these small pieces. One thing I would warn is to be careful when pressing. Especially when wet, press and not iron - you don't want to stretch these tiny pieces out of shape. 


6 inch finished = 6 1/2 inch unfinished.

That seems to be the confusion in this quilt-along. When pieced into the larger top, the blocks will be 6 inches. Unfinished, however, there is a 1/4" seam allowance all around. Many quilters have been trimming their unfinished block to 6" and then have to remake or add a border. To prevent this mistake, I keep my 6 1/2" square ruler nearby. I know never to trim a block smaller than this ruler. Personal note: I prefer this brand and it has little grippers on the underside of the ruler to keep in place while trimming. 


For the free pattern, visit The Splendid Sampler website for Natalia Bonner's Focal Point.


+*+*+*+*+*+*+*+*+*+*+*+*+*+*+*+*+*+*+*+*+*

That's a lot of pieces!

I've decided to keep a counter at the bottom of these posts to track them. 
The totals are based on the original patterns and not on deviations.

Hearts Aflutter = 9
Wings = 46 
Lots of Love = 48
Happy Happy = 11
Simple Simon = 12
Focal Point = 36


Total to Date: 162 pieces


Wednesday, March 2, 2016

Simple Simon (TSS 005)


Looky! Looky! Simple Simon, by Celine Perkins, is the fifth block in The Splendid Sampler quilt-along. It was a quick and fun one!

Can you believe these are all 6"?
Now, my intent is to use my stash so it will be very scrappy. Does it fit in? The green? I thought I needed to introduce some medium values to the top. If so, then I'll make sure to use that green again in another block. If not, it was a really quick block to make and can always be replaced.


To download Simple Simon, visit The Splendid Sampler website. 

Tuesday, March 1, 2016

Common Threads - Uncommonly Good

Yesterday, Steve and I headed off to the Alma/St. Louis area in Michigan to visit the middle of the mitten. Pretty cool, eh? We were up for an adventure. Don't let the picture fool you - except for this photo, we had wonderful sunlight and clear roads.


While tooling along US 12 (Michigan Avenue - that road is everywhere!), Steve said there was a quilt shop right up the road. (Keeper, right? I know!). We moseyed down this little village center and wandered in.  

Welcome to Common Threads Quilt Shop in St. Louis, Michigan. The very pleasant shopkeeper behind the counter regaled us with stories of people calling & thinking they were talking to a shop in Missouri.


It was a LOVELY shop (we didn't go wild taking pictures inside as we only asked permission to take a selfie). But the shop was filled with the newest Moda fabrics, a wall of reproduction prints, a baby nook, notions corner, and many, many shop samples. Wall hangings, quilts, bags, Easter pouches.


I regret I live so far, but I told Steve that if we're ever in the area (located between Lansing and Mt. Pleasant) we are definitely detouring. Until then, time to cut up my new creamy polka-dotted prints.


Common Threads Quilt Shop
109 North Mill Street
St. Louis, MI 48880
https://cthreadsquilts.wordpress.com/