Tuesday, October 11, 2011

Lookie! Lookie!

Another finish for the year!  Completed my Tis the Season Stitch-Along and can now join the others in the Some Kind of Wonderful round!  Woot!

Thanks, Lauri, for holding this up on a breezy day!
My friends Ann and Lisa are going to be shocked - the next round.... involves.... APPLIQUE!  I've been saving Teresa of Fabric Therapy's Glue Stitck Applique tutorial, and she makes it look so easy so I'm diving in and getting my feet wet!

Hope all of you stay along for the ride and share any advice along the way!

Stitches!
Elisa

Saturday, October 8, 2011

Halloween is a Stitch!

Several years ago a friend (hi Lisa!) came to visit me this time of year.  The one comment she made over and over again is, "You Michiganders sure love your Halloween!"  WE DO!

My neighbors have already decorated. Seems like every house has eyeballs in the tree, graves up the path, headless scarecrows, wispy ghosts.  Saw a full-grown adult pass by in a complete ladybug costume walking her dog, and the black cat next door is sporting a shark fin.  Yes, I'm trying to get a picture for you!

I love pulling out Halloween projects from years past.  Thought today I'd share my favorite one - embroidery patterns from one of last year's Quilt Sampler magazines.

BOO TO YOU!


Had to share all the blocks with you!  What do you have hanging on your walls?

Happy Stitching!
Elisa

p.s. I'm hoping amongst all the Halloween happenings to find time to make that fabulous "bowling pin" kitty from Teresa of Fabric Therapy.  LOVE IT!

Thursday, October 6, 2011

Quiltin' Done!

Woot! Finished quilting my TIS SAL! Just have to bind & label, and I'm done! Can't play the next round with the other girls until I've completed this one!

Just stitched in the ditch, but I like it! Will share when the whole quilt is complete.

Happy Stitchin'
Elisa

By the way, my friend Allie-Oops, is a genius! Followed her advice in basting the quilt, and my backing was perfectly smooth! http://allie-oopssweethappylife.blogspot.com/2011/09/undone.html

Wednesday, October 5, 2011

(Almost) Wordless Wednesday - Waymarking Edition

It's Wednesday again - time to show off some treasures from my recent travels!

Berry Lake - Commerce Township

Art Prizes - Grand Rapids

Pelican from John Ball Zoo

Tollgate Farm - Farmington

Train Tracks - Traverse City

ME!  Hometown Ferndale

Bridge - Harsen's Island

Lower Huron Metropark

Yates Cider Mill - Rochester
Cider Mills are HUGE here!

Gazebo - Burgh of Southfield

Greasy spoon - Warren

Octagon House - Shelby Township

Detroit Skyline & Ambassador Bridge - Belle Isle

Manoogian Stain Glass - Detroit Institute of Arts

Hope you like the latest tour of my treasures!
Elisa

Not all those who wander are lost ~ J.R.R. Tolkein

Tuesday, October 4, 2011

Tutorial: Perfect 1/4" Border

Many years and many miles ago, I was attending a quilt retreat in the White Mountains.  It was late - Saturday night - and I was in my pajamas sewing down a binding in the grand ballroom.  Seeing quilters pass me, I looked up to see a small, excited crowd around a table near the rear.  Getting up to see what excited my carb-loaded, sleep-deprived companions, I spied a small lady, talking to the crowd, beaming ear-to-ear.  

I regret that I forgot this lovely lady's name.  I'm grateful I remember her technique.  She was demonstrating the perfect 1/4" border.  Done correctly, this border can really enhance a top or even just a block.  Here is her story:


In the example below, I will demo adding a 1/4" red border to a quilt.  There is a little waste, but the results are very well worth it.  It's not as complicated as it may seem - I've loaded this post with pictures.  Please disregard the cat hair - Ginger was very excited about this tutorial!

  To begin, sew on the first border to your quilt using four 1 1/4" wide by length-of-top (LOT) strips.  I've already done so in this picture.


Next, you need to cut your 2nd border strips.  Calculate the strip desired and add 1" to the width.  In this example, I wanted a 1.5" strip so I cut it 2.5" (I don't normally add such a small 2nd border but I knew I'd be adding several more borders to the final top).


This next step is optional but helpful - if the instructions aren't clear, it may make sense if you read ahead two steps and come back.

In this step, I turned my top over (wrong-side up).  Aligning my ruler along the white/striped fabric (my original top), mark the border as seen below.  Do this at both ends.  You will use this as a stitching guide.


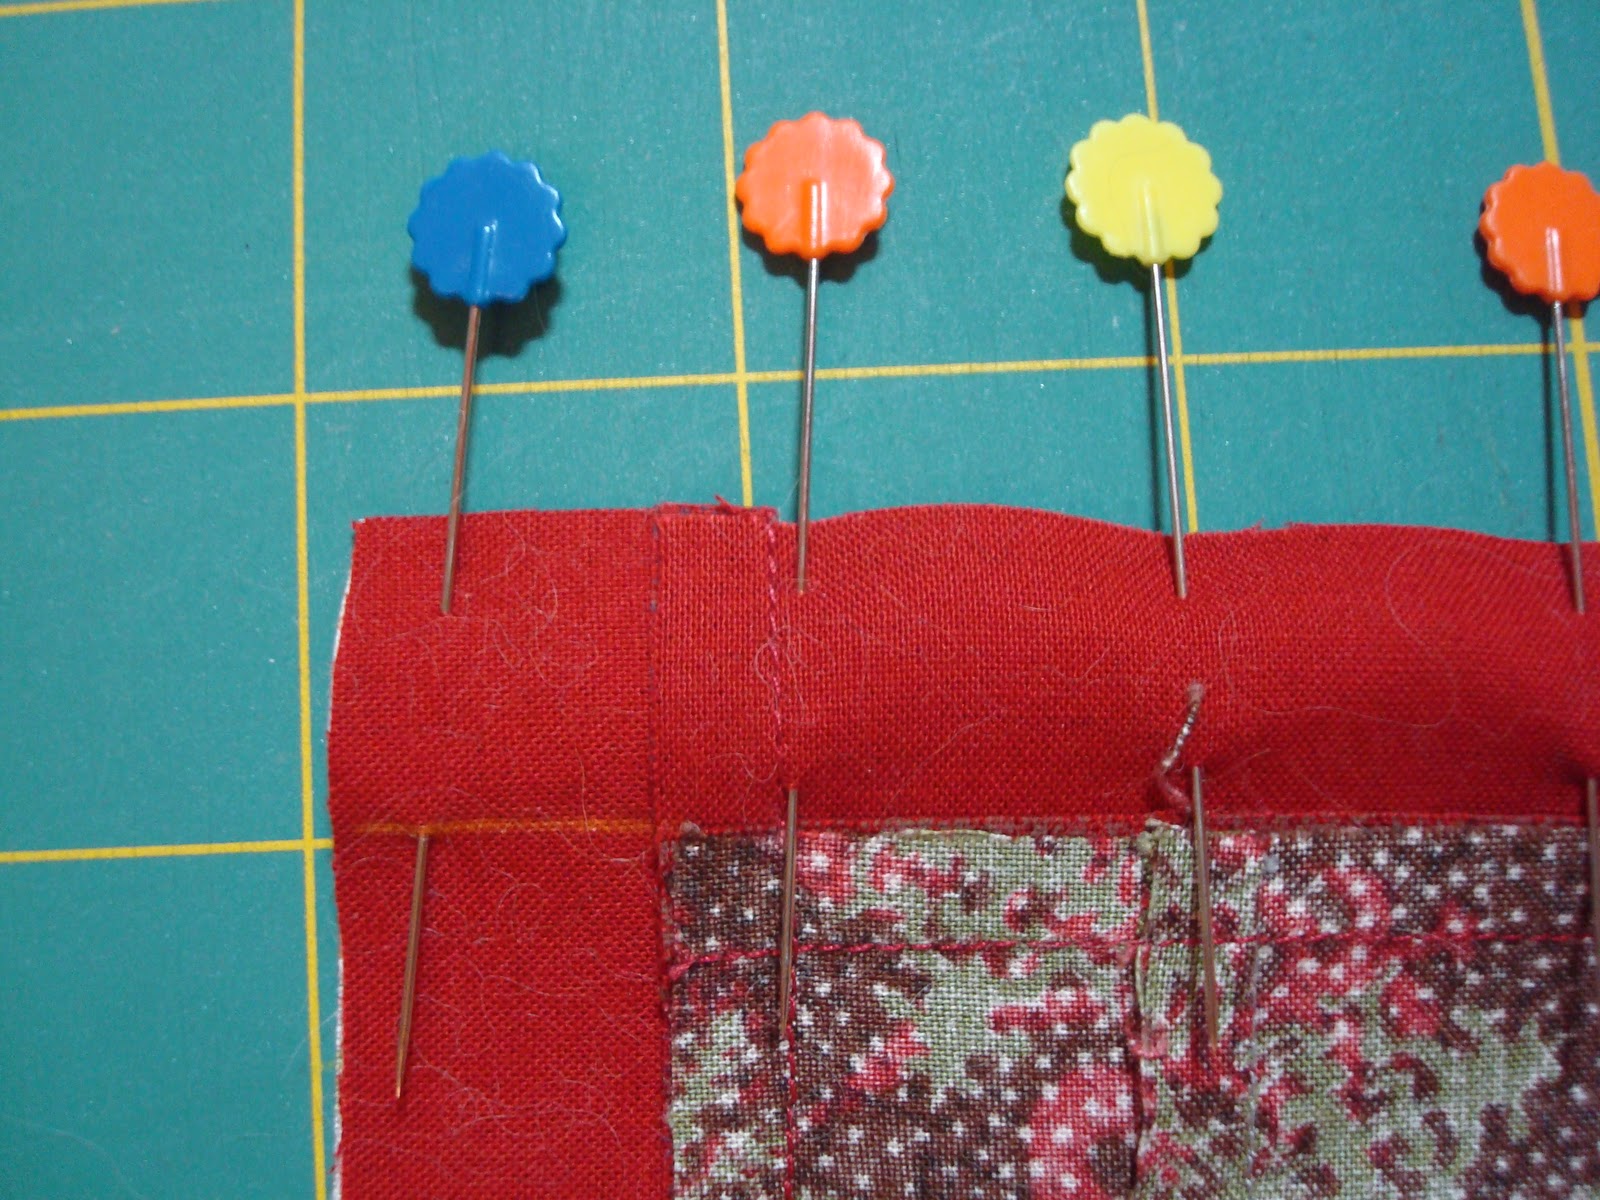
With wrong-sides together and raw-edges aligned, pin your next border to your top.  VERY IMPORTANT: You will want to pin from the back, as seen below.


Here's the BIG TRICK.  You will NOT sew on the next border along the raw edges, as normal.  Instead, you will use the previous 1/4" seam allowance as your guide.


See how cool that is?  


By using the previous seam as your guide, your completed product will be a clean 1/4" finished.


When you are done and turn your top over, the "front" side will look like this.


See what happens when I flip it up?  Here's my 1/4"!


Trim excess before pressing.  Yes, it is necessary to have this little waste.  By having this excess width, it allows you to pin your borders firmly before sewing and gives your feed dogs something to grab as you move along.  This prevents a wobbly, wonky border.


Press.  Voila!


Now that I've added the top and bottom borders, I will repeat this process for the side borders. Notice I'm marking my borders to use as a guide when sewing.  Note, if you are good at "eyeballing it", you can skip the marking stage.


Second border is complete.  


Easy, eh?

Hope this was clear.  Used correctly, this is a very effective accent to any top.

Happy Stitching!
Elisa


Monday, October 3, 2011

I'm Stitching! I'm Stitching!

I love this SAL and have loved spending my evenings stitching away.  Here is the completed top.  I'm not sure I'm keen on how the borders turned out - got a little too fancy.  Think I should've left out the smaller "circles" border and went right from cranberry to green.


I missed the deadline (Sept 30th) but I'm plugging away - Chooky won't let me join round 3 until I'm done.  Round 3 is Anni Down's Some Kind of Wonderful and, probably much to my friend Ann R.'s amusement, is filled with the "A" word!  Guess I'm going to learn applique!

Stop back in a day or two and I'll share how I achieved the perfect 1/4" border/sashing.  Very neat!

Wednesday, September 28, 2011

(Almost) Wordless Wednesday - Waymarking Edition

Spent several hours wandering around Detroit this weekend.  
Just on the corner of Woodward and Warren are some amazing places!

Hecker Mansion

Inns on Ferry Street - the "inn" consists of 5 houses in a row

Josephine Ford Sculpture Garden in front of the Creative Center

Detroit Institute of Arts - Rodin's Thinker is out front

Detroit Public Library

Charles H. Wright Museum of African American History

Detail on the Maccabees Building

Park Shelton Art Nouveau Building

Patterns of Detroit Mural - Look!  A Quilt!

Scarab Club

Freer House - once the home of the Peacock Room

I'm not saying all of Detroit is like this... but you don't have to look far to see remnants of its Golden Age!

"Not all who wander are lost".  Visit Waymarking.com to see more!

Elisa